Okay, we’ve done the primary back muscles with Baby Cobra. We’ve done the butt muscles with Bridge. We’ve gone twice ‘round on the core with Dead Bug and some tougher variations on Dead Bug.
Then, we began to stretch with Dragon Lunge, and continued with Downward Dog, Squatted Downward Dog and moved on to Puppy to decompress the spine. Then we stretched your pectoral muscles with Scorpion Twists.
The hard stuff began with plank push ups, and moved on to rotator cuff curls (which I call them that because, well, I didn’t really know what else to call them). In that last one I mentioned the ‘Neutral Spine’ and realized that mentioning it, and telling you to perform an exercise using it, is somewhat unhelpful if you don’t know (1) what a ‘neutral spine’ is and/or (2) how to form it.
So…the neutral spine.
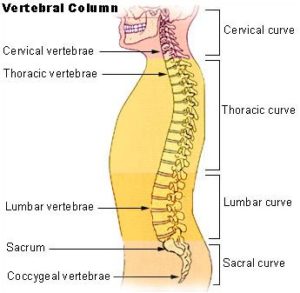
A “Neutral Spine” is the natural, proper curves of the spine. I say both natural and proper because years of poor posture can (and in my case did) change the natural curvature of your spine away from what God and nature intended.

There are several methods for discovering/forming your neutral spine and it is critical to many of the exercises I use in postural correction. Since we have thus far been mostly performing exercises while lying on the back, or kneeling in table top, I will give you my favourite method for each.
Discovering the neutral spine while lying on the back:
- Begin in Savasanna, corpse pose. Lay on your back, feet hip width apart, toes flopped open, hands palms up at your sides.
- Your spine is now relaxed, in its natural curve. The problem is that it may not be the correct curve. For example, me. 40 years of poor posture and abusing my lower back made my natural lumbar curve pretty non-existent.
- Lying like this my lower back was completely flat to the floor, and that is not good. You can test your own lumbar curve by trying to slide your finger tips under it; they should be able to fit beneath your low back. So…
- Draw your knees up until your thighs are vertical, and clasp your kneecaps with your palms.
- Relax your legs, keeping them from falling by holding them with your hands. I find hooking my thumbs together makes this grip easier.
- Relax for 30 seconds
- Drop your feet straight to the floor. The rotation of your hips as your thighs drop forces your lumbar to curve upward.
THIS is your neutral spine.
Discovering the neutral spine while in table top:
- Take table top position (on hands and knees, arms and thighs vertical.
- Look straight down while gently pulling your chin straight up into your neck
- Put a water bottle at the juncture of your low back and hips
- This is where your belt would be, if you were wearing pants
- Balance the water bottle. Don’t let it move, rolling neither forward nor backward
- Trust me, this is a lot tougher than it may sound.
- If it’s too hard with a water bottle, try a yoga block. Place it in along its second smallest face. For a real challenge, place it on its smallest face.
THIS is your neutral spine.
Eventually we will do exercises to learn and form the neutral spine in other positions, but we’ve done a lot of prone and table top exercises thus far, so for now, learn these two. And when you’re doing any of the posture exercises, only do them to a depth where you can maintain a neutral spine. Doing so will teach your body strength and endurance in proper posture, creating persistent, positive change for your overall posture.
